We all have scraps of food that we throw away everyday. Some of these food scraps can actually be regrown with only water! Here's 6 of our favorite store-bought items that we love to regrow for both decoration and consumption:
Avocado

- To grow an avocado in water from seed, you first need to take the pit out of the middle of the avocado, wash it, and let it dry.
- Once dry, insert 3 toothpicks into the side of the avocado. Make sure to evenly space these around the circumference of the seed.
- Fill up a glass of water and suspend the avocado seed with the toothpicks setting on the top of the glass. Make sure the seed is placed wide end down, with 1 inch of the seed submerged in water.
- Keep out of direct sunlight and replenish the water as needed.
- You should see roots and a sprout within 2-6 weeks (if you’ve followed all of these steps correctly and still do not see anything, try another seed and start over).
- Once your avocado the stem reaches about 6 inches tall, cut it back about 3 inches. When the leaves grow back again, plant in a draining pot with rich soil, leaving the seed half-way exposed.
- Water well, making sure the soil is moist but never saturated.
- Now sit back and wait just 10-15 years and you will have an avocado tree producing enough avocados to fuel your avocado toast obsession ( ;
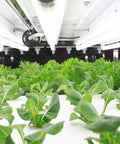
Lettuce

- To regrow a head of lettuce, first cut the lettuce leaves off the stem (if you haven’t used it already) and place the stem in a dish of water covering about 1 inch.
- Set in a sunny window or under a grow light.
- Check each day and keep the water at the same level. You should see new sprouts after about 3 days.
- Let grow until the lettuce grows to your desired height. Snip off your desired harvest and enjoy a fresh new head of lettuce!
- You can even try continuing the same process again to grow bottomless lettuce heads!
Garlic

- Garlic sprouts have a little lighter taste of garlic than the cloves, and are similar to green onions in appearance.
- To grow garlic sprouts, place a garlic clove in a small jar or plate and add enough water to cover the bottom of the clove.
- Place on a windowsill and within a few days you should start to see roots.
- Once the sprouts rise up to about 3 inches tall, you can cut off about ⅓ of the shoot and consume!
Celery

- To regrow a stalk of celery, cut the celery about 2 inches of the bottom where the roots are.
- Place 4 toothpicks in the celery scrap root, about halfway in the middle.
- Fill a small jar with water until it is up covering the bottom of the celery about ½ inch.
- Place in an area that receives some indirect natural light.
- Change the water every few days and make sure the celery root end is always submerged.
- Now sit back and watch it regrow!
Green Onion

- Green onion is the easiest kitchen scrap to grow because they come from the store with the roots still attached.
- When you cook with your green onion, make sure to cut the onions a few inches above the roots.
- To regrow from your scraps, place the saved bulbs roots down in a small container with just enough water to cover the roots.
- Place near a sunny windowsill and change the water every few days.
- Now sit back and watch it regrow!
Pineapple

- If you plan to regrow a store-bought pineapple, make sure to twist the top of the pineapple off prior to cutting into it for consumption - this method takes just the right about of pineapple needed for regrowth.
- Next, pull off the bottom leaves around the base so it has lots of room for roots to grow.
- Once the base is cleared, make a straight cut at the base to slice off any fruit that is still attached.
- Poke 3 toothpicks in the top just above where it will sit in the water.
- Fill a jar with water up to the point where it will cover the bottom of the pineapple scrap.
- Sit the pineapple top down into the water covering the bottom.
- Place near a sunny windowsill and change the water every few days.
- Now sit back and watch it grow its roots. Once the roots are established, you can transplant it outside in soil and let it keep growing!